
Learn how to build a simple Azure Function that lets you execute inline code in your flows! The possibilities are endless – regular expressions, string operations, recursive functions, math operations, and much more. This post contains two parts; how to create the Azure Function and how to execute and use it in Power Automate.
How to create an Azure Function App
In this part, we look at how to set up an Azure Function that we are going to use as a helper for writing inline JavaScript code in a Power Automate cloud flow. This is a step-by-step guide where we go through the steps in Azure for creating an Azure Function App and the function that allows us to write code in Power Automate.
Step 1: Firstly go to your Azure Portal, https://portal.azure.com/ (the link opens in a new tab). I use my MSDN subscription and the free credits in Azure for test purposes. If you don’t have an MSDN subscription or any subscription at all. You get access to the popular Azure services for free in 12 months here, https://azure.microsoft.com/en-us/free/ (the link opens in a new tab). The next step assumes that you are logged into the Azure Portal.
Step 2: When you are logged in to the portal you can an overview of your recent resources and azure services. For example:
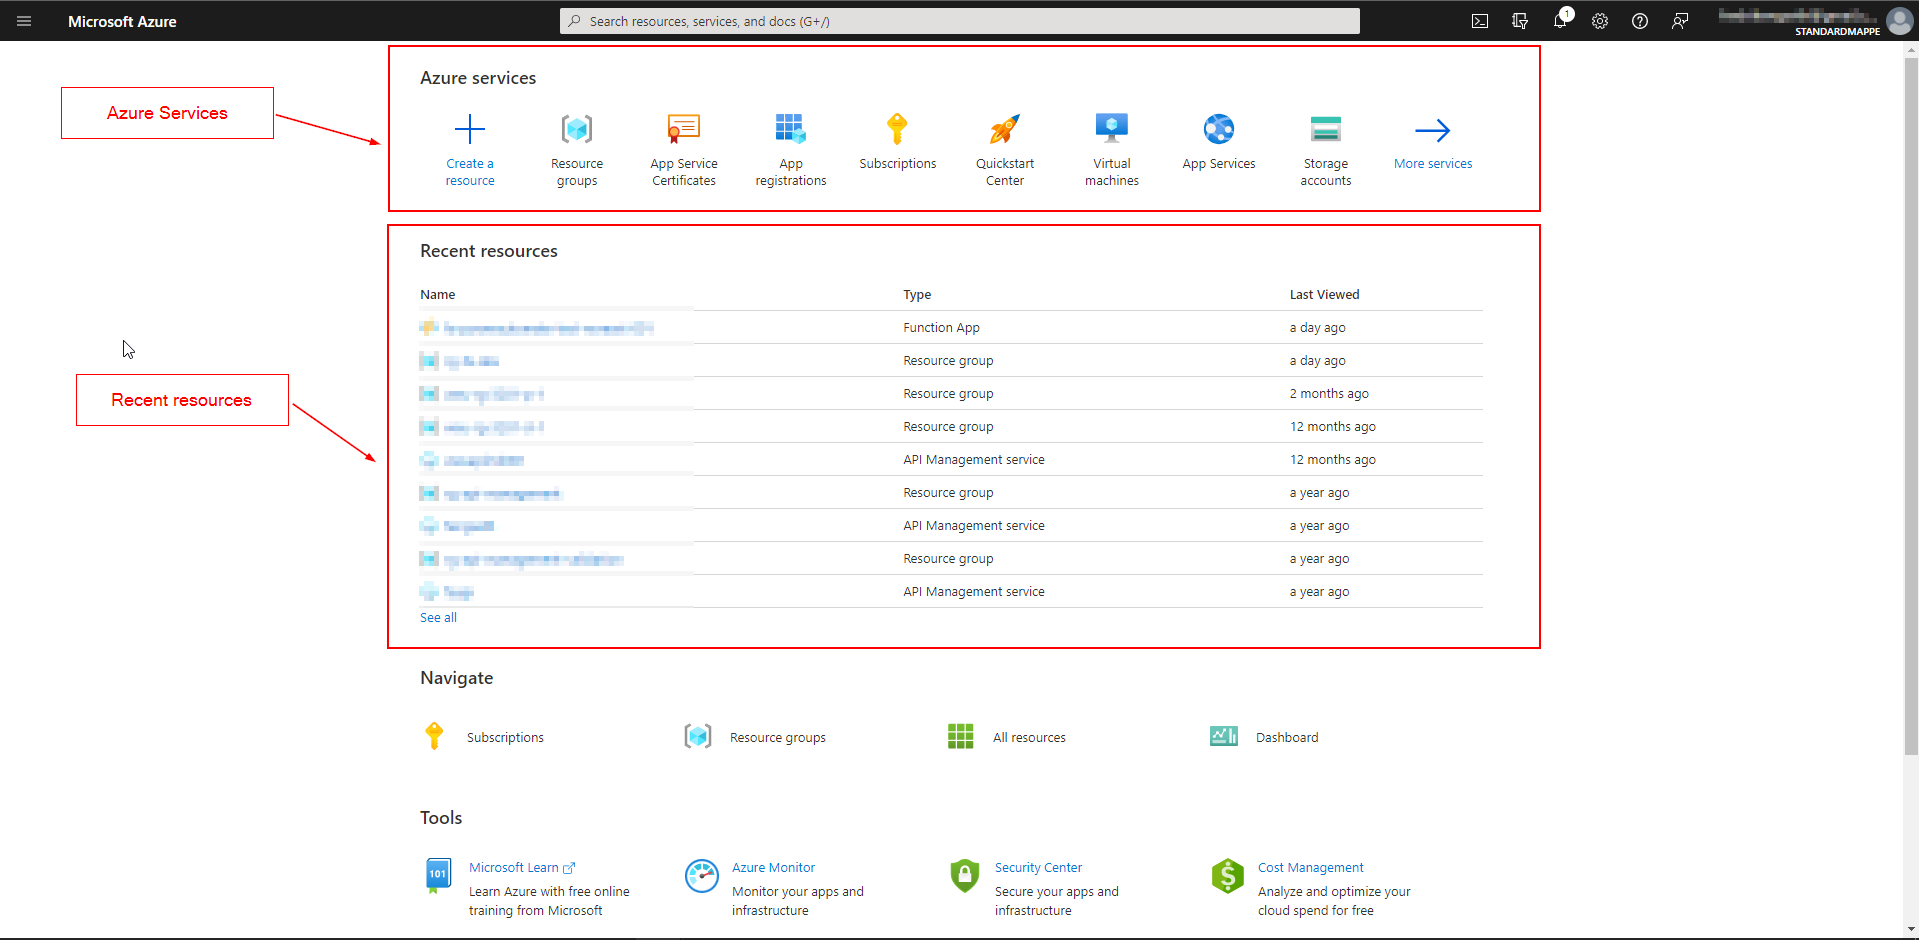
Step 3: To create an Azure Function App click on + Create a new resource as shown in the image below. This will open a pane with services that are available to create, proceed to the next step.

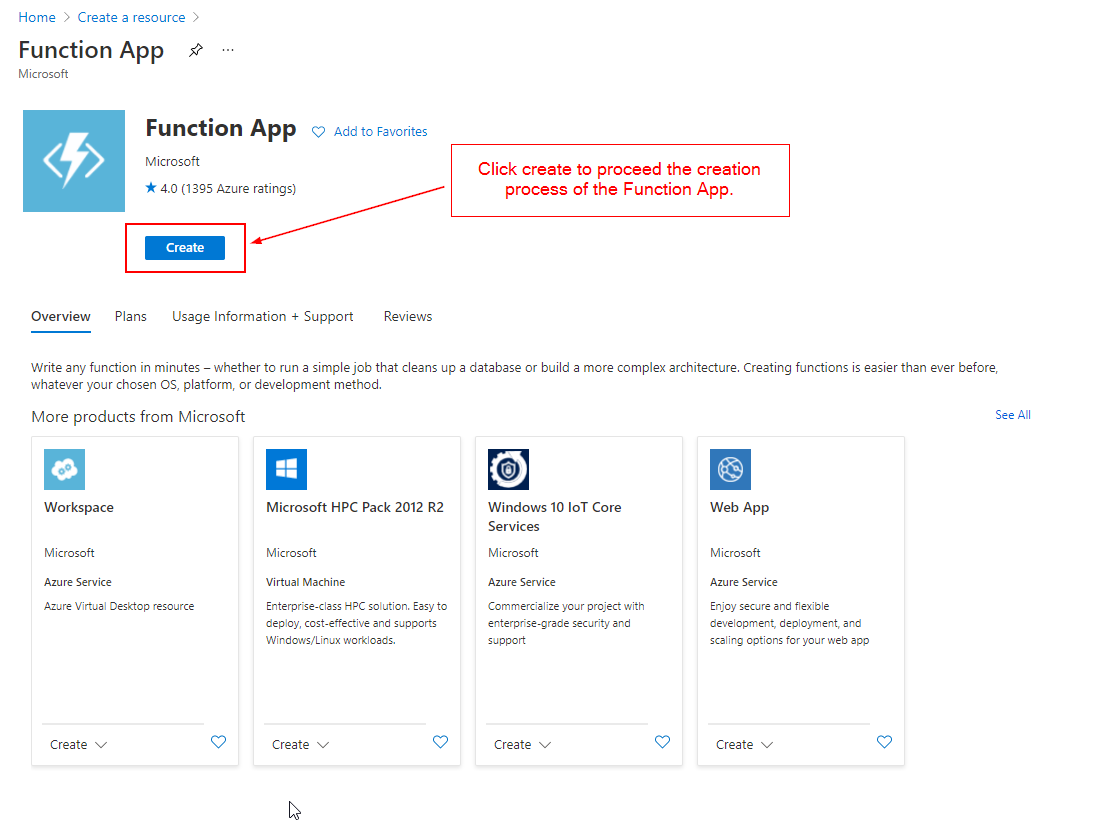
Step 4: In the Create a resource pane search for “Function App”. This will open the creation page of the Function App directly when hitting enter. Proceed with the steps below the image.

Step 5: Click the create button to start the creation process. Next up is adding information about the resource, like resource group, location, name, and settings for the app.
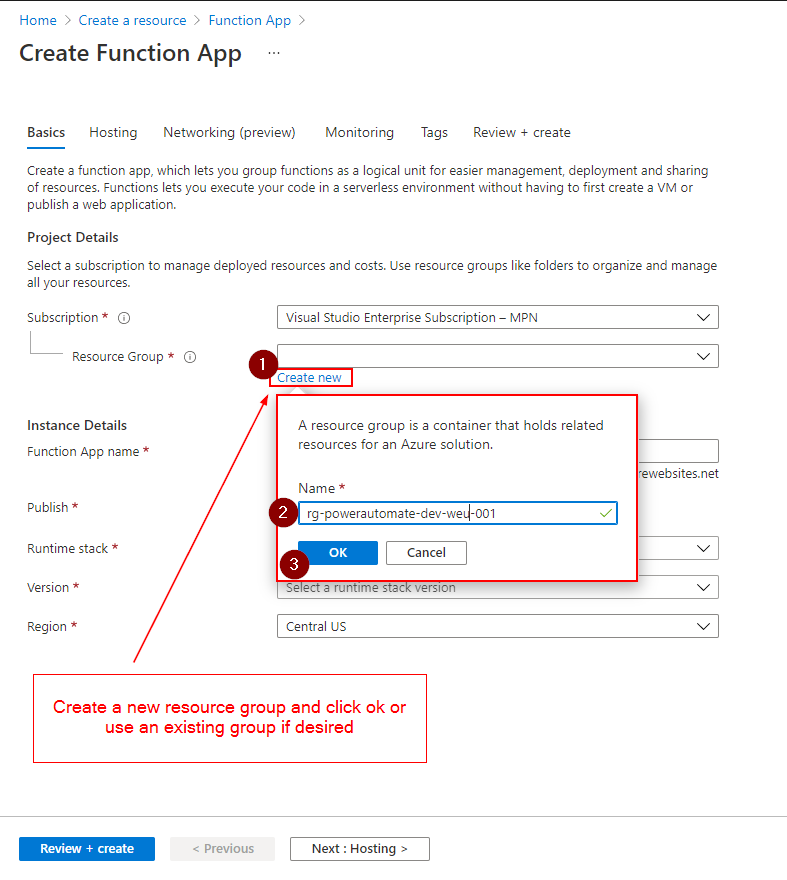
Step 6: In this step, we add the necessary/required basic information for the Function App, where we add information about the resource, like resource group, location, name, and settings for the app.
When naming resources in Azure I like to follow the naming convention that Microsoft recommends as best practice as can be found below.
https://docs.microsoft.com/en-us/azure/cloud-adoption-framework/ready/azure-best-practices/resource-naming (link opens in a new tab).
The basic configuration in this example is as follows, and the basic information pane is shown with multiple images below.
Subscription: My MSDN subscription
Resource Group: rg-powerautomate-dev-weu-001
Function App Name: PowerAutomateHelper (This must be a unique name)
Publish: Code
Runtime stack: Node.js
Version: 12 LTS
Region: West Europe

Step 7: The next step in the creation process is to review the information we added for the Function App and the remaining step is to create it. The step looks as follows in the Review + create step in Azure. This starts the deployment progress, as can be seen in the next step.

Image of the Review and Create during the process of adding a Function App.
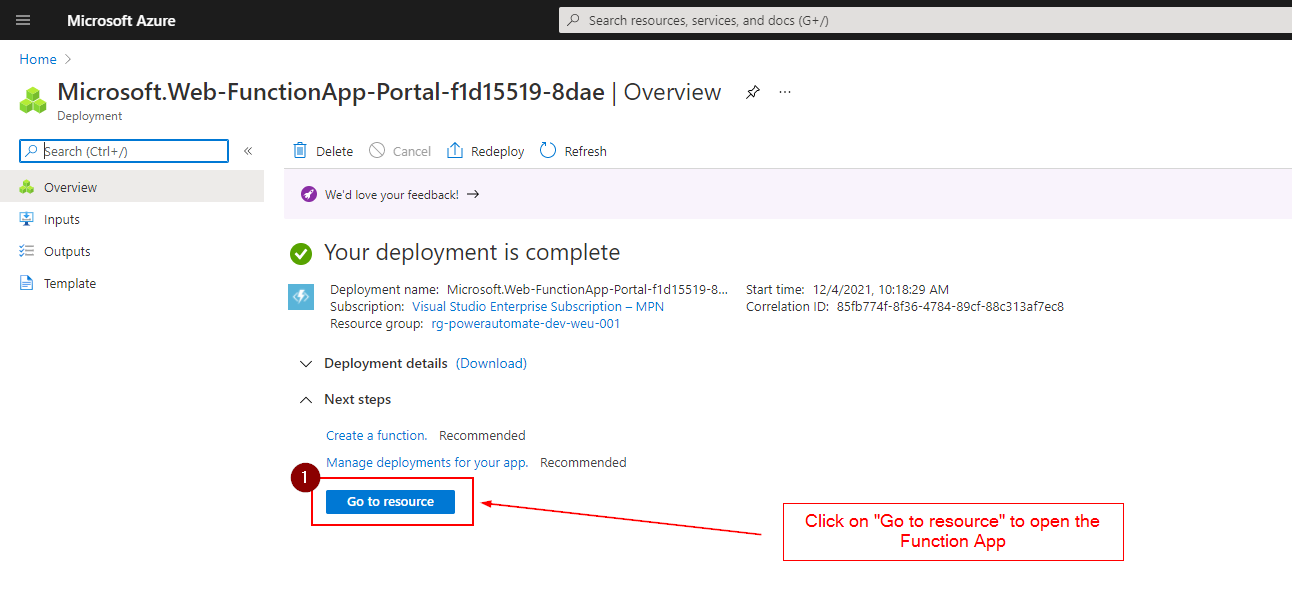
Step 8: After clicking the create button the deployment process of the resources starts immediately.

And finishes a short time after. To open the Function App click on Go to resource.
After opening the Function App click on the Functions item in the side menu. This is where we are going to add a function that allows us to write code in Power Automate.

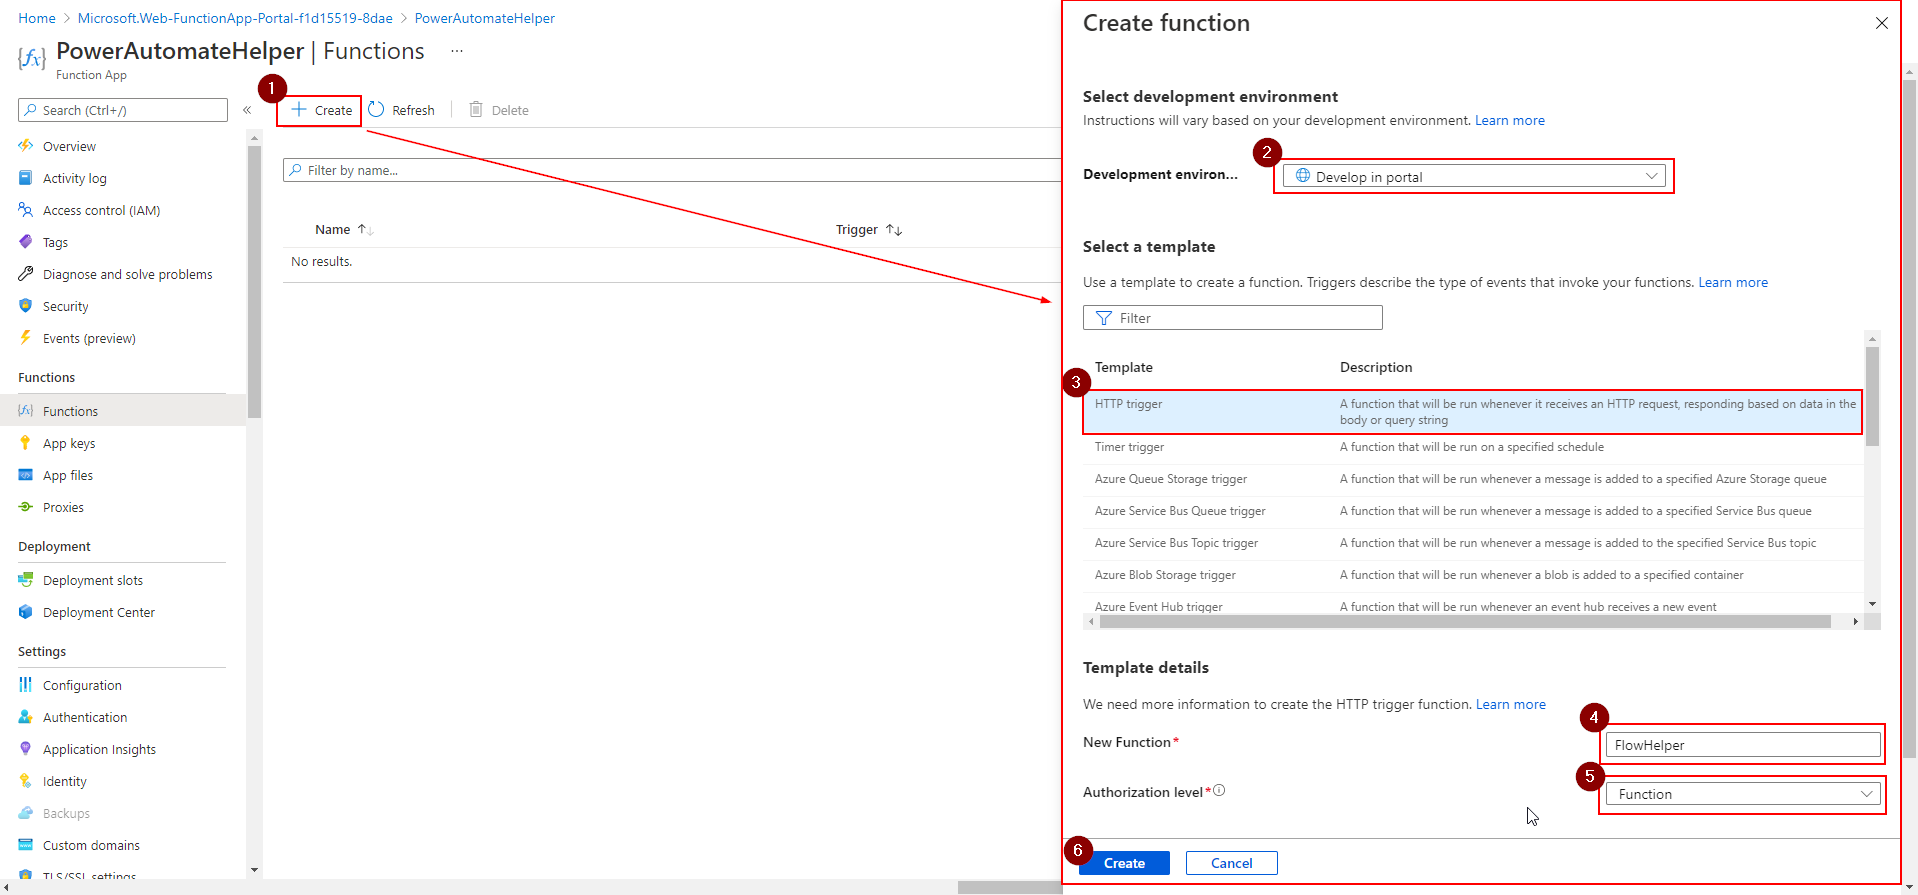
After going to Functions we need to complete some steps to create a new function. These steps are as follows and are shown in the image below:
1. Create a new function by clicking Create. When the configuration pane opens follow the steps in the image below.
2. Choose to Develop in portal since we are going to add a simple code snippet.
3. Choose HTTP trigger since we are going to call this function from Power Automate
4. Give the function a name. For example FlowHelper.
5. Set Authentication level to Function.
6. Then click create and we can add the code in the next step.
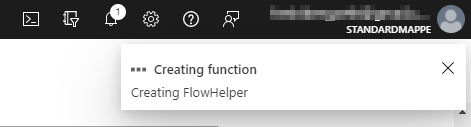
When clicking on create in the previous step the function gets created.
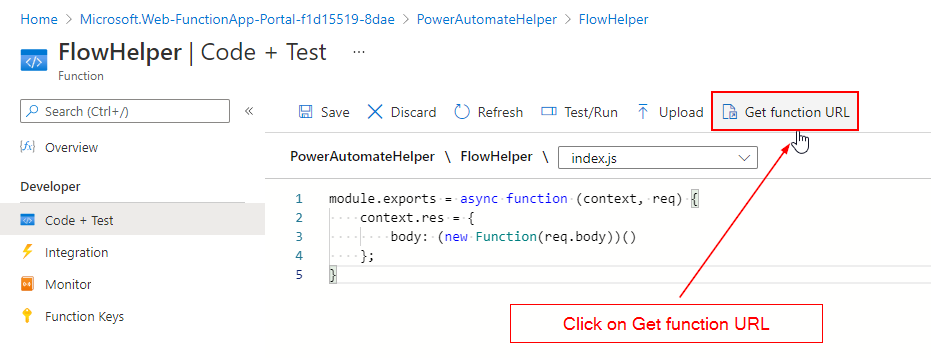
Step 9: When the function is created we can add code by going to Code + Test as shown in the image below.

This opens the code editor of the function and can be seen in the image below.

Step 10: In this step, we add the code to allow us to write code in Power Automate. Replace the boilerplate code with the code below and click save. The code creates a new function that takes a body parameter and returns the result. When we write code in Power Automate the Function App will execute the code we pass the function and it will return the result. Make sure to save changes after adding the code.
module.exports = async function (context, req) {
    context.res = {
        body: (new Function(req.body))()
    };
}

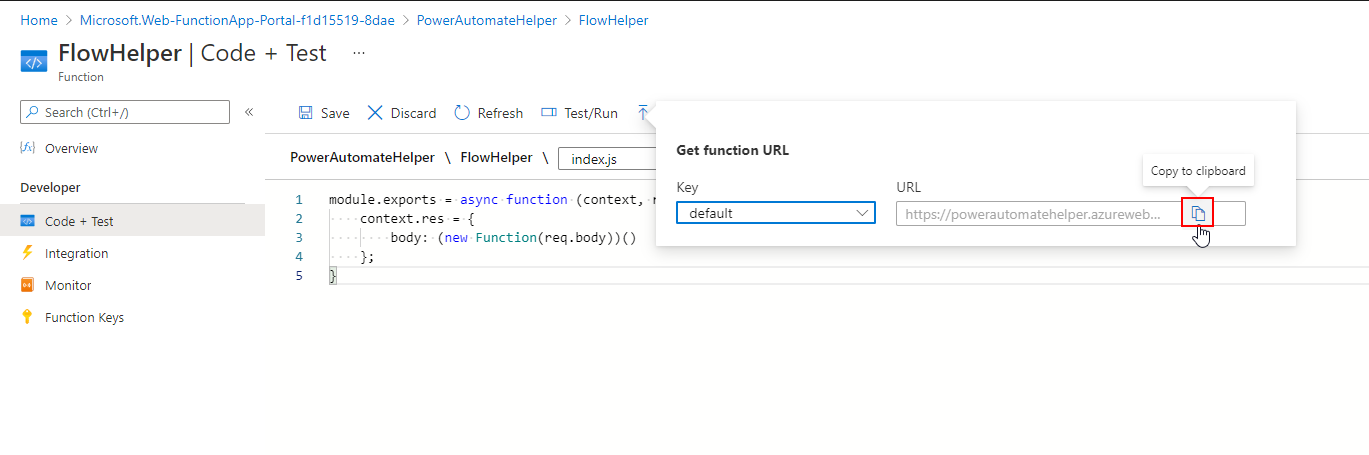
Step 11: Before we move to Power Automate we need to get the function URL, we need this as we are going to call this function from Power Automate. To get the function URL click on the Get function URL and copy the URL as shown in the images below.
After clicking the Get function URL it opens a dialog with the link. Choose Copy to clipboard and save the URL for use in the next part of this post.
Step 12: This completes the steps for creating the Function App. In the next part, we look at how we can write inline JavaScript code in Power Automate.
Building the Power Automate Flow
In the previous part created a Function App, and in this part, we look at how we can use that function to write inline JavaScript code in Power Automate. We proceed with a step-by-step walkthrough here as well. In the example we look at how to can replace special characters in a string using JavaScript code within the flow.
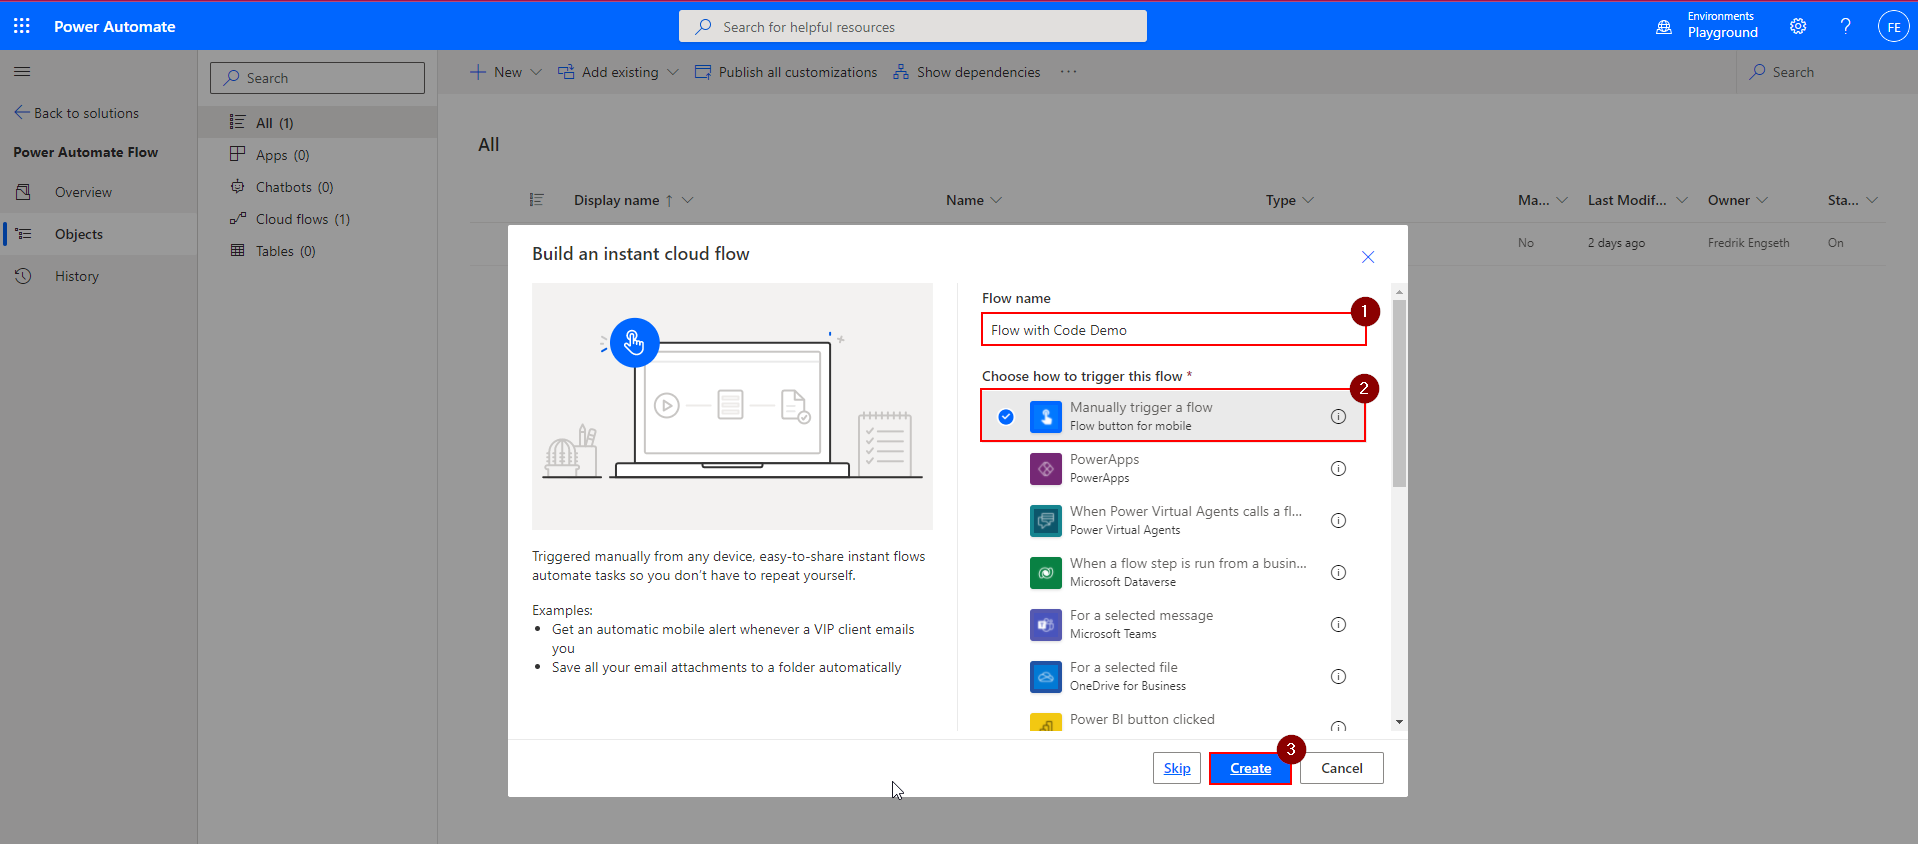
Step 1: The first step is to create a new cloud flow. For this example, we create an Instant cloud flow so that we can trigger it manually. In this example, I have a solution called Power Automate Flow that adds the instant cloud flow to. To create a new flow proceed with the steps in the image below.

Step 2: After the proceeding steps are completed a dialog opens. In the dialog give the flow a name and choose “Manually trigger a flow” and then create. This takes as to the newly created flow. To save the flow an action must be added to be able to save it. We add this in the next step.
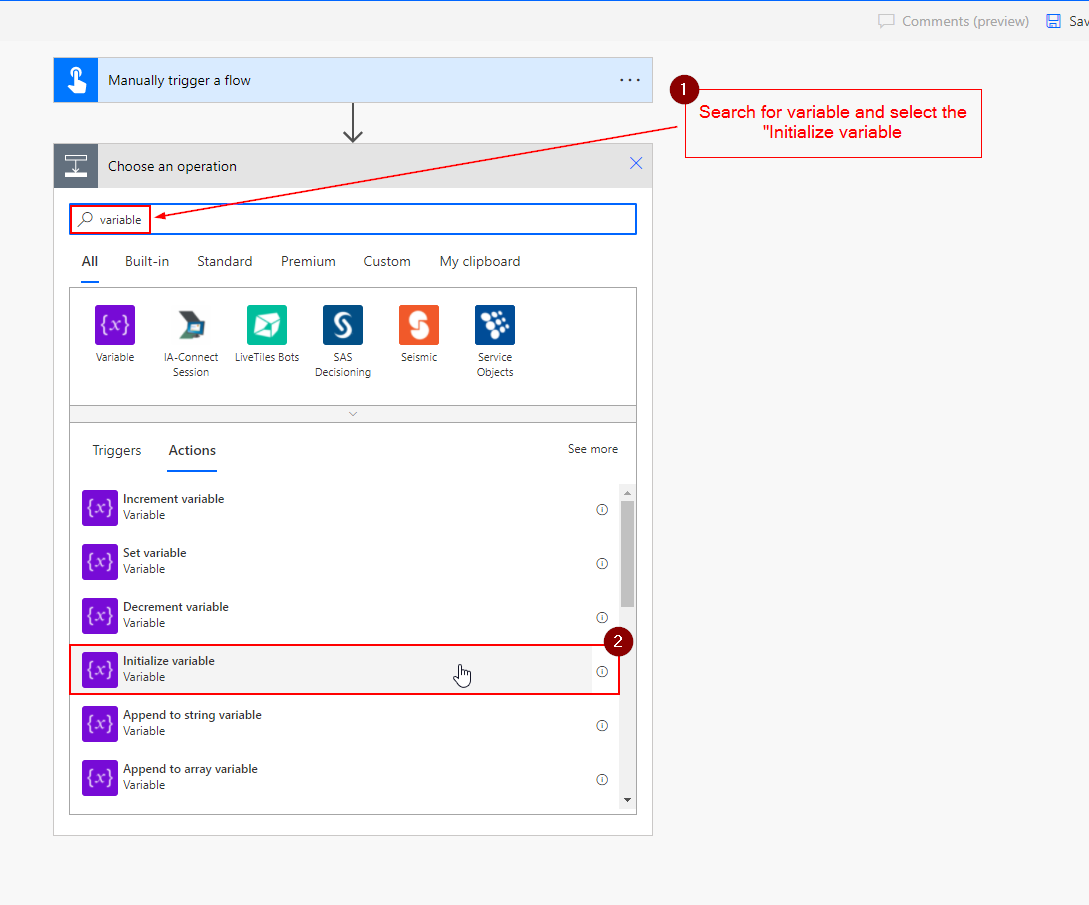
Step 3: Next, we add a string variable that contains special characters that we want to replace with an underscore using code. After the flow trigger > Click add a new action > Search for variable > Select Initialize variable.
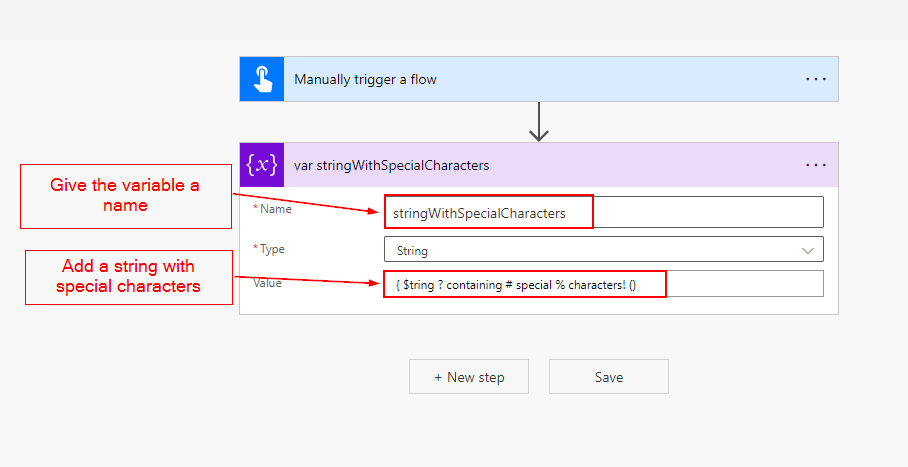
Step 4: After adding the variable, give the variable a name, choose a variable type of string, then add a string with special characters.
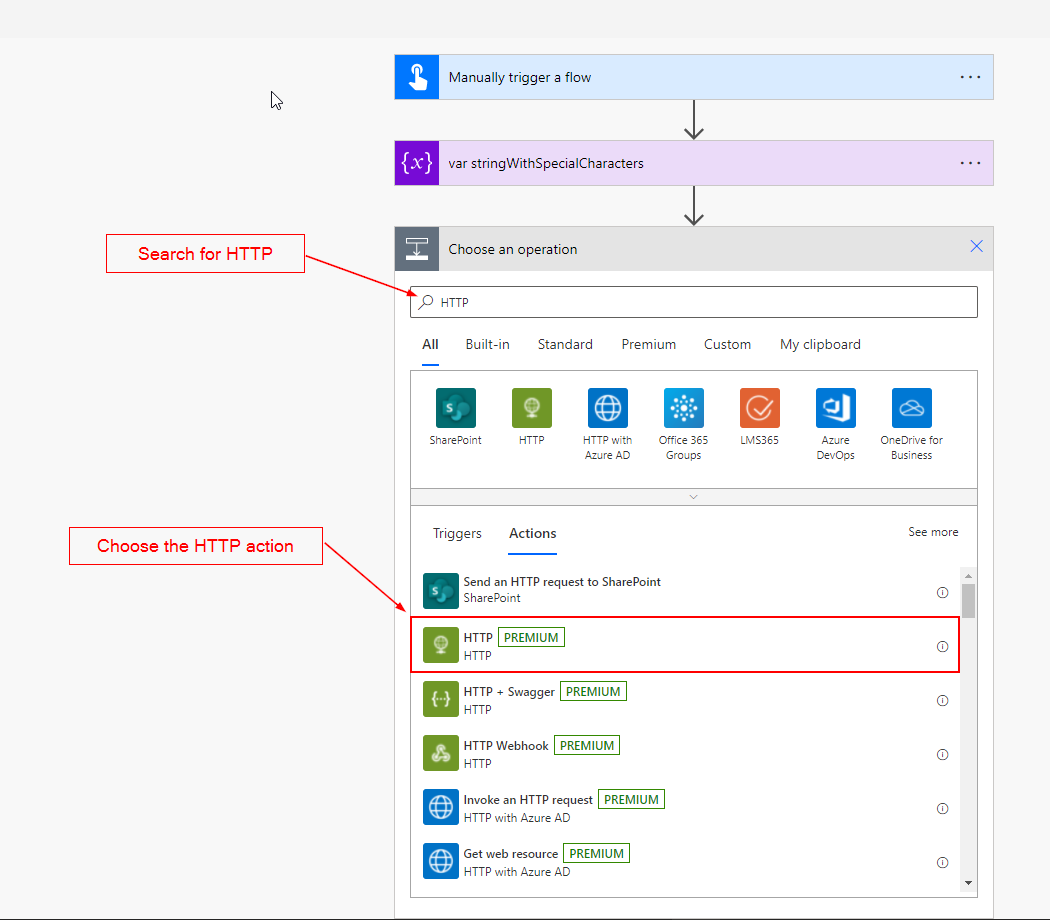
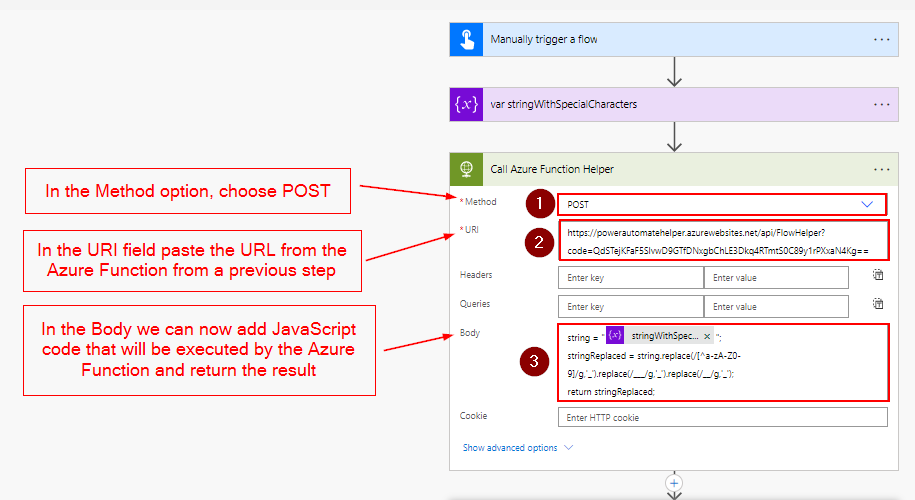
Step 4: In this step, we add the action that is going to call the Azure Function that will execute the JavaScript code we are going to add in the next step. Click on add a new action and search for HTTP and choose the HTTP action as shown in the image below.
Step 5: In the HTTP action we add the URL that we copied from the Function App and in the Body, we can now write JavaScript code that gets executed by the Azure Function and outputs the result that can be used further in the flow. As we see in the next step.
The code in this example uses regex to find and replace characters that don’t match numbers, lower and upper case letters with an underscore. If it recurs multiple underscores in a row it gets replaced by one underscore. For instance, if the string contains multiple special characters in a row that has been replaced.
string = "@{variables('stringWithSpecialCharacters')}";
stringReplaced = string.replace(/[^a-zA-Z0-9]/g,'_').replace(/___/g,'_').replace(/__/g,'_');
return stringReplaced;
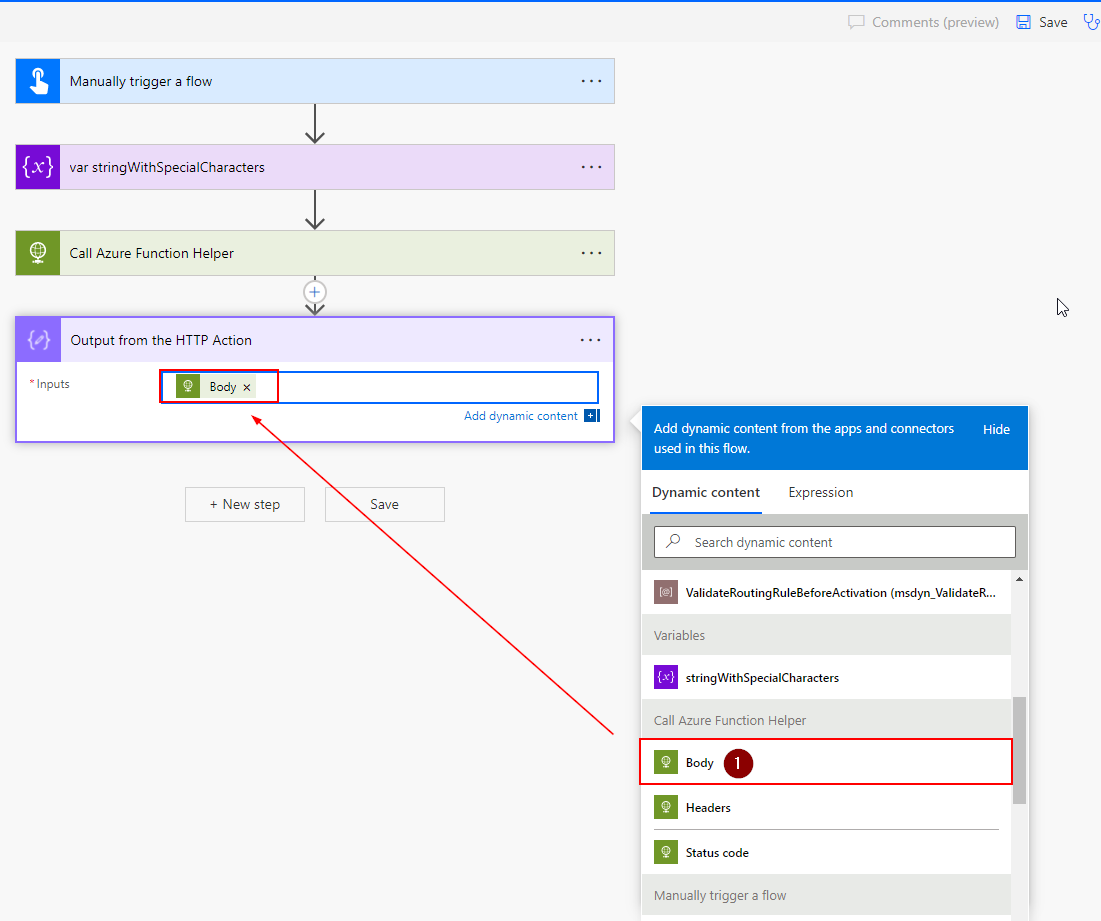
Step 6: To see the result from the HTTP action we can create a compose action that will output the result.

Step 7: In the compose action, add the body from the HTTP action
Step 8: When testing/running the flow we can see that the string with special characters has been replaced with a string where all special characters are replaced with an underscore.
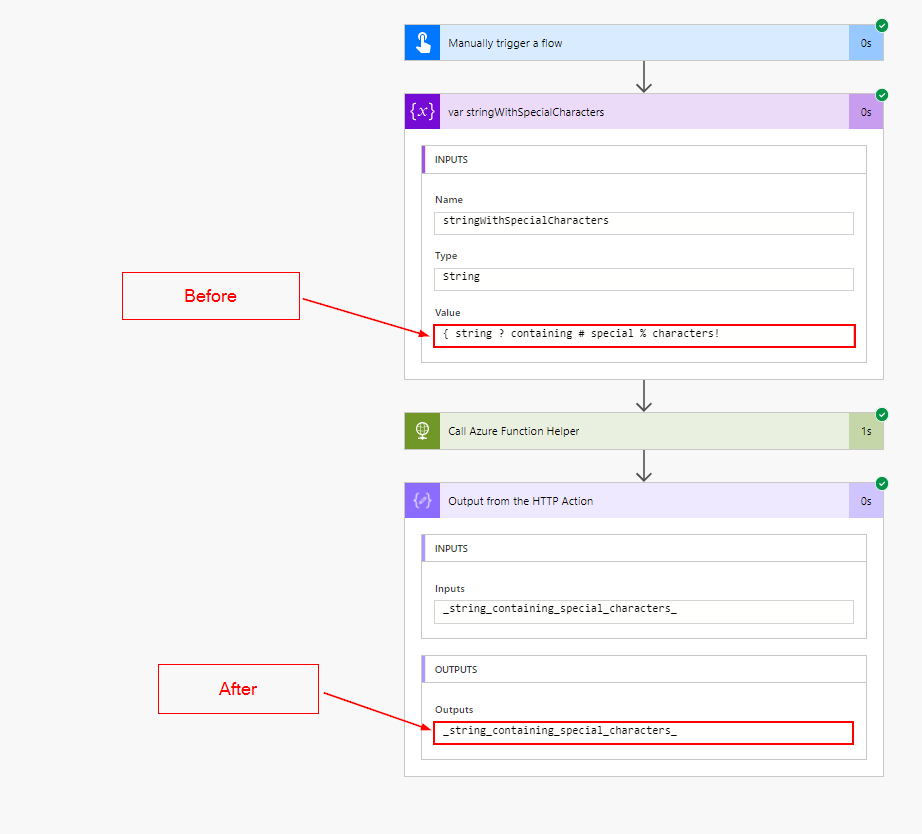
The Flow run of the HTTP action looks like this:

Hope you found it valuable and see further use cases this can provide.
For More Content See the Latest Posts
- Speeding Up Power Automate: Replacing ‘Append to Variable’ with ‘Compose’ for Efficient Workflows
 Discover how replacing ‘append to’ variables with ‘compose’ actions in Power Automate can drastically speed up your flows.
 - Why and How to Implement DevOps?
 Discover how to implement DevOps for faster software delivery, improved quality, and better team collaboration.
 - Quick Tip: Show and Hide Option Set Options in Dynamics 365 with JavaScript
 Learn to dynamically manage Option Set options visibility in Dynamics 365 forms, enhancing UI and user experience in just a quick read.
 - Understanding Dynamics 365 Customer Service Components: Key Features and Benefits
 Learn the concepts of Dynamics 365 Customer Service: Boost satisfaction with case management, knowledge bases, and multi-channel support.